In this
article, we will see how to use ADO.NET Data Services introduced in
SharePoint Foundation Services 2010. We will perform CRUD (Select,
Insert, Update and Delete) operations using ADO.NET Data Services.
The steps to create a SharePoint Site using a Template ‘Team Site’ remains the same, as shown in my previous article SharePoint Dashboard with Common Filters using PerformancePoint Services 2010.
Now assuming you have
created a SharePoint site with ‘Team Site’ template, let’s add a
‘Customers’ list as described in below table. To create a list, click on
‘Lists’ link from the left hand navigation pane and click on ‘Create’
button. A ‘Create’ dialog box will be shown –

Once we have created a
first list, we need to add a couple of columns as described in the below
tables. To create a column, click on list settings from the top
‘Ribbon’ as shown below –

Now click on ‘Create Column’ link from the list settings page as shown below –

Now create the lists as described below. Also add some sample data in the lists –
Customers List –

Let’s add sample data to our ‘Customers’ list.
Create a ‘Window Project’ named ‘DataServiceInSPS2010’ using ‘Microsoft Visual Studio 2010’ as shown below –

Now design the Windows Form for our operations as shown below –


Note: Do
not forget an important setting. Right click the ‘Windows Project’ in
solution explorer and go to properties. From properties window, choose
‘Build’ option from the right hand side and set ‘Platform target’ to
‘x64’ as shown below –

Now we will have to add
a Data Service reference in our project. Let’s first test the service
which will allow us to query the data of the Lists, available in our
SharePoint site. So open IIS and browse the SharePoint Web application
and find ‘_vti_bin’ folder from that web application. Click on ‘Content
View’ on the right hand window and look for a service named
‘ListData.svc’ as shown below –

Right click the
‘ListData.svc’ and click on ‘Browse’. You will see the list of all the
SharePoint Lists in a browser as shown below –

Now let’s go back to
our Windows Application which we have created few steps back and add a
service reference of ‘ListData.svc’ data service in our application, as
shown below –

This will show you a
Add Service Reference dialog box. Copy the URL of the ‘ListData’ service
which we just browsed. Click on the ‘GO’ button and name the service as
‘PurchaseOrderProxy’ as shown below –

When you add the
reference of ADO.NET data service in your application, it creates an
‘Object – Relational Mapping’ to the Lists, in our web site. It also
creates a class called ‘SiteNameDataContext’ which contains the
properties for each list of the web site.
The benefits of using ADO.NET Data Services –
1) You query the list data which is strongly typed.
2) As ADO.NET Data Services uses ‘Object – Relational Mapping’, it creates a type for each list in site data context class.
3) Any kind of client application can use ADO.NET Data Services.
Once you add the
service reference, let’s start coding the application. As per our
design, we have a DataGrid. First step is to show all the items of
‘Customers’ list in our DataGrid control.
Let’s go to the code
behind of the windows form and declare an object of the SharePoint site
data context which got generated when we added the service reference.
The code is shown below –
Import the namespace - using DataServiceInSPS2010.PorchaseOrderProxy;
Declare an object of the site data context at class level –
PurchaseOrderSystemDataContext
dataContextProxy = new PurchaseOrderSystemDataContext(new
Uri("http://wingtipserver:21068/_vti_bin/ListData.svc",UriKind.Absolute));
Now in the Form_Load
event, write the code shown below. This will pass the current user ID
and password to authenticate the user and fetch the data of ‘Customers’
list as shown below –

If you observe the code
shown above, each Customer item is presented by a class called
‘CustomersItem’. By writing a LINQ query, we are fetching the data from
the customers list.
Now hit ‘F5’ and you will see the data of ‘Customers’ list in our DataGrid as shown below –

Now let’s write the code for our ‘New’ button as shown below –

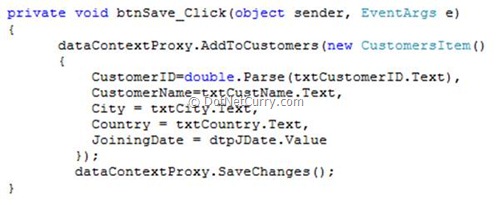
Now let’s write the code to insert the item in the list ‘Customers’ as shown below –

In the above code, we
are using AddToCustomers method which will take an instance of
CustomerItem. Site data context provide methods for adding, updating and
deleting for each list available in SharePoint Site. To insert the item
into the list, use the method – SaveChanges() of the site data context.
Please note that for updating and deleting, you need to fetch all the columns of the list.
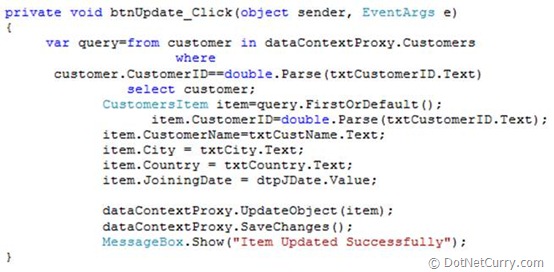
Now let’s add the code for updating an item available in ‘Customers’ list. The code is shown below –

In the above code, we
are first fetching the row of the customer list and then making the
changes using a method UpdateObject() which takes an object of
CustomerItem class. After this step, we call the SaveChanges() method
which will update the item back to SharePoint customers list.
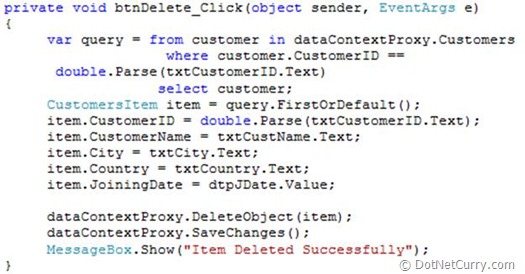
Now let’s write the code for deleting an item from the customers list. The code is as shown below –

In the above code, we
are first fetching the row of the customer list and using a method
‘DeleteObject’ which takes an object of CustomerItem class. After that
we are calling SaveChanges() method which will delete the item from the
SharePoint customers list.
Now try adding, updating and deleting the items from the ‘Customers’ list.
Conclusion –
In this Article we have seen how to use ADO.NET Data Service called
‘ListData.svc’ to perform the CRUD operations against the SharePoint
List.

No comments:
Post a Comment