Friday 27 April 2012

How To Create a Visual Web Part Project

In this task, you create a Visual Web Part project in Microsoft Visual Studio 2010.
  1. Start Visual Studio 2010, click File, point to New, and then click Project.
  2. Navigate to the Visual C# node in the Installed Templates section, click SharePoint, and then click 2010.
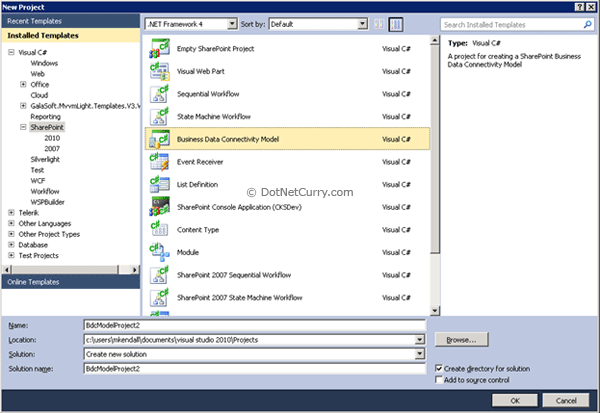
  3. Select the Visual Web Part project template (see Figure 1), provide a name (such as, SampleWebPart), a location for your project, and then click OK.


    Figure 1. Select the Visual Web Part project type

    Select the Visual Web Part project type
  4. In the What local site do you want to use for debugging dropdown, select the site to use (such as http://localhost/sites/SampleWebSite). Also select the Deploy as a farm solution option and then click Finish.

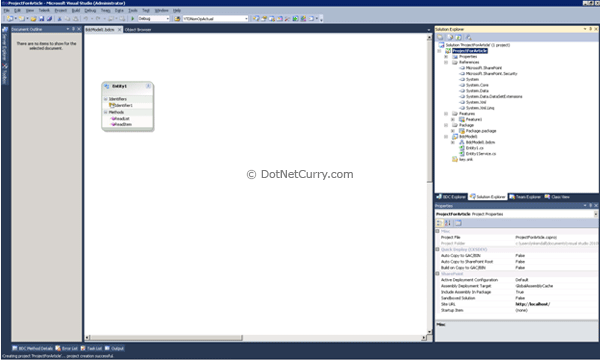
    Note that after the project is created, Solution Explorer contains the default Visual Web Part named VisualWebPart1 (see Figure 2). Also see in Solution Explorer the presence of the Features and Package nodes. A feature organizes your application in a way that SharePoint Foundation understands. Features can be deployed to SharePoint Foundation at the site or Web level. The package contains features and other assets used when you deploy solutions to SharePoint Foundation.


    Figure 2. The SampleWebPart project in the Solution Explorer

    The SampleWebPart project in the Solution Explorer

Add a TreeView Control to the Web Part

In this task, you add a TreeView control to the design surface of the Web Part. The TreeView control displays a hierarchical view of lists and SubWebs.
  1. In Solution Explorer, expand the VisualWebPart1 node, right-click the VisualWebPart1UserControl.ascx file, and then click View Designer. This action opens a view to drag-and-drop controls from the toolbox onto the Web Part designer surface.
  2. From the Toolbox on the left side of the screen, click the Navigation section, and then drag a TreeView control onto the design surface. If you do not see the Toolbox on the left side of the screen, on the View menu, click Toolbox.
  3. Select the TreeView control and in the Properties panel in the lower-right corner of the Visual Studio screen, type the name siteStructure in the ID field.

Add Code to the Project

In this task, you add Microsoft Visual C# code to the project that iterates through all lists and SubWebs in the SharePoint site, and adds them to the TreeView control.
  1. In Solution Explorer, expand the VisualWebPart1UserControl.ascx node, right-click the VisualWebPart1UserControl.ascx.cs node, and then click View Code.
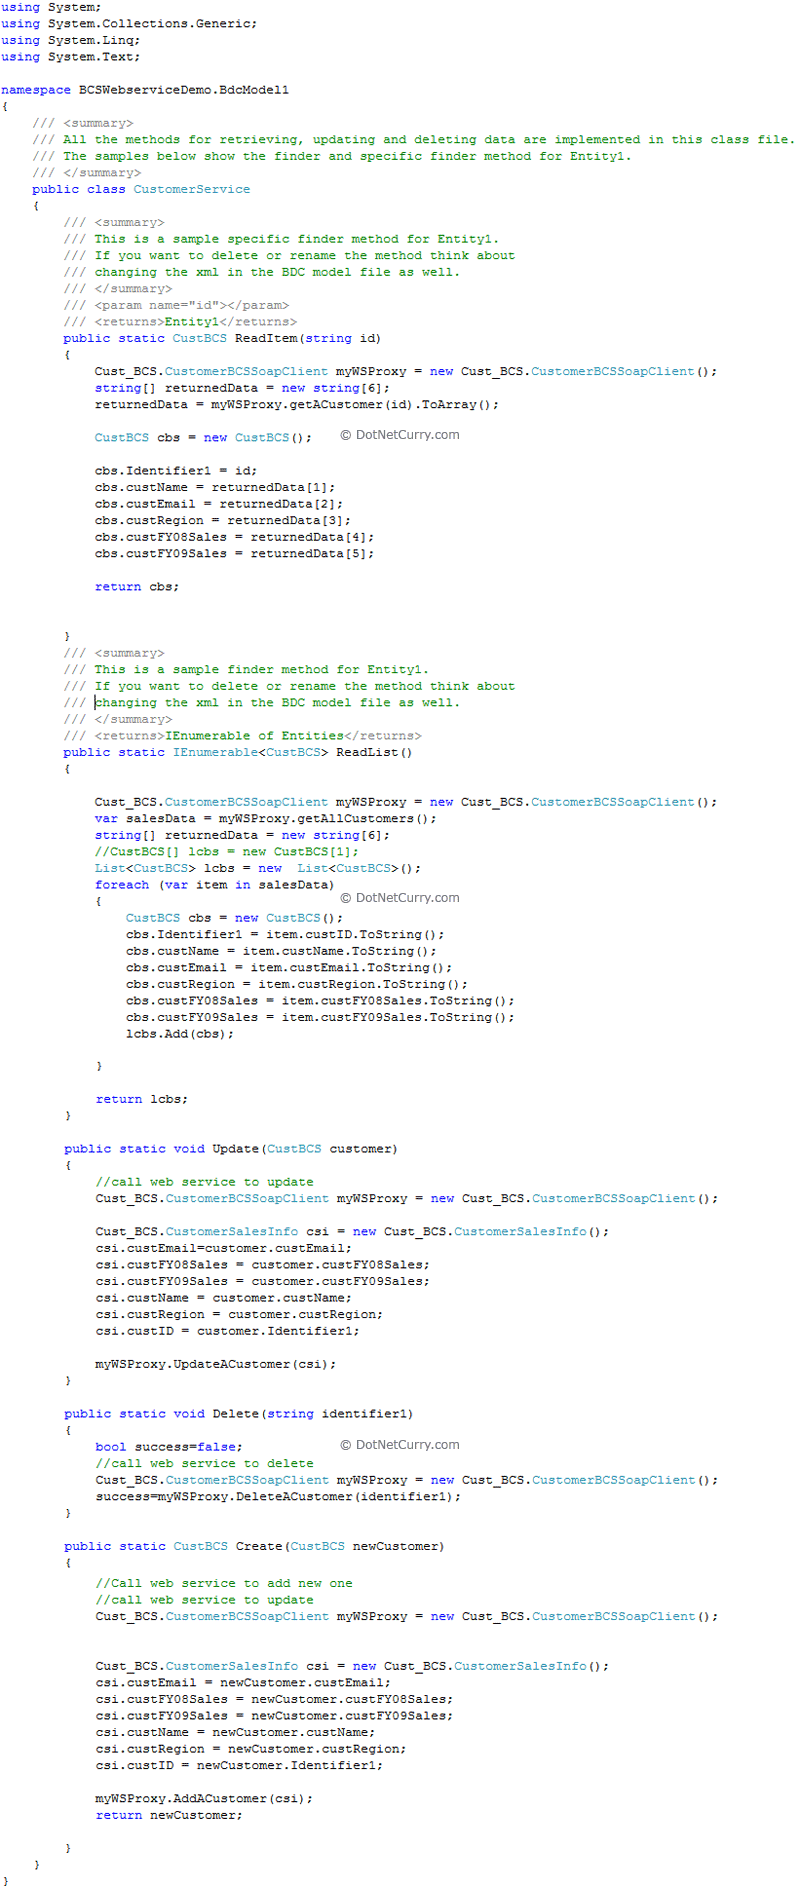
  2. Next, substitute the following C# code for the code in the code screen.

    using System;
    using System.Web.UI;
    using System.Web.UI.WebControls;
    using System.Web.UI.WebControls.WebParts;
    using Microsoft.SharePoint;
    using Microsoft.SharePoint.Utilities;
    using System.Web;
    namespace BonnevilleTestBed.Bonneville
    {
      public partial class BonnevilleUserControl : UserControl
      {
        protected void Page_Load(object sender, EventArgs e)
        {
          SPWeb thisWeb = null;
          TreeNode node;
          thisWeb = SPContext.Current.Web;
          //Add the Web's title as the display text
     for the tree node, and add the URL as the NavigateUri.
          node = new TreeNode(thisWeb.Title, null, null,
     thisWeb.Url, "_self");
          //The Visual Web Part has a treeview
     control called siteStructure.
          siteStructure.Nodes.Add(node); //Get a reference to the 
    current node,so child nodes can be added in the correct position.
          TreeNode parentNode = node;
          //Iterate through the Lists collection of the Web.
          foreach (SPList list in thisWeb.Lists)
          {
            if (!list.Hidden)
            {
        node = new TreeNode(list.Title, null, null
    list.DefaultViewUrl, "_self");
              parentNode.ChildNodes.Add(node);
            }
          }
          foreach (SPWeb childWeb in thisWeb.Webs)
          {
     //Call our own helper function for adding each 
    child Web to the tree.
            addWebs(childWeb, parentNode);
            childWeb.Dispose();
          }
          siteStructure.CollapseAll();
        }
        void addWebs(SPWeb web, TreeNode parentNode)
        {
          TreeNode node;
          node = new TreeNode(web.Title, null, null, web.Url, "_self");
          parentNode.ChildNodes.Add(node);
          parentNode = node;
          foreach (SPList list in web.Lists)
          {
            if (!list.Hidden)
            {
       node = new TreeNode(list.Title, null, null,
     list.DefaultViewUrl, "_self");
              parentNode.ChildNodes.Add(node);
            }
          }
          foreach (SPWeb childWeb in web.Webs)
          {
            //Call the addWebs() function from itself
     (i.e. recursively) 
            //to add all child Webs until there are no more to add.
            addWebs(childWeb, parentNode);
         childWeb.Dispose();
    
          }
        }
      }
    }


Build and Deploy the Web Part

In this task, you build and deploy the Web Part project.
Build and deploy the project by using one of the following options:
  • When debugging the SharePoint solution, use the F5 key to build and deploy your solution. By doing this, the debug experience includes steps such as help for creating a Web Part Page and resetting Internet Information Services (IIS).
  • Alternately, you can build and deploy your solution by clicking the Build menu, selecting Build Solution, verifying that the solution builds without any errors, and then selecting Deploy Solution.

Creating Custom Timer Job in SharePoint 2010

Create Custom List and name it  ListTimerJob
Open Visual Studio 2010 >File > New >Project >SharePoint 2010>Empty SharePoint Project. >Name it Custom_TimerJob>Ok
Check Deploy as farm solution>Finish

create a class that inherits from the Microsoft.SharePoint.Administration.SPJobDefinition class. To implement this class, you need to create a few constructors and override the Execute() method as following
01namespace DotnetFinder
02{
03    class ListTimerJob : SPJobDefinition
04    {
05         public ListTimerJob()
06
07            : base()
08        {
09
10        }
11
12        public ListTimerJob(string jobName, SPService service, SPServer server, SPJobLockType targetType)
13
14            : base(jobName, service, server, targetType)
15        {
16
17        }
18
19        public ListTimerJob(string jobName, SPWebApplication webApplication)
20
21            : base(jobName, webApplication, null, SPJobLockType.ContentDatabase)
22        {
23
24            this.Title = "List Timer Job";
25
26        }
27
28        public override void Execute(Guid contentDbId)
29        {
30
31            // get a reference to the current site collection's content database
32
33            SPWebApplication webApplication = this.Parent as SPWebApplication;
34
35            SPContentDatabase contentDb = webApplication.ContentDatabases[contentDbId];
36
37            // get a reference to the "ListTimerJob" list in the RootWeb of the first site collection in the content database
38
39            SPList Listjob = contentDb.Sites[0].RootWeb.Lists["ListTimerJob"];
40
41            // create a new list Item, set the Title to the current day/time, and update the item
42
43            SPListItem newList = Listjob.Items.Add();
44
45            newList["Title"] = DateTime.Now.ToString();
46
47            newList.Update();
48
49        }
50}
51}
As you can see this job just add a new item to a ListTimerJob list every time it’s executed
Now that you have the job built> Right click on the Features >Add Feature

Right click on the Feature1 ” you can rename the Feature1 to any name” > Add Event Receiver

As you can see the event Receiver class inherits from the Microsoft.SharePoint.SPFeatureReceiver and This class handles events raised during feature activation, deactivation, installation, uninstallation, and upgrade. But we only need FeatureActivated & FeatureDeactivated event handler to install/uninstall our custom timer job as following
01namespace DotnetFinder.Features.Feature1
02{
03[Guid("9a724fdb-e423-4232-9626-0cffc53fb74b")]
04public class Feature1EventReceiver : SPFeatureReceiver
05    {
06        const string List_JOB_NAME = "ListLogger";
07        // Uncomment the method below to handle the event raised after a feature has been activated.
08
09        public override void FeatureActivated(SPFeatureReceiverProperties properties)
10        {
11            SPSite site = properties.Feature.Parent as SPSite;
12
13            // make sure the job isn't already registered
14
15            foreach (SPJobDefinition job in site.WebApplication.JobDefinitions)
16            {
17
18                if (job.Name == List_JOB_NAME)
19
20                    job.Delete();
21
22            }
23
24            // install the job
25
26            ListTimerJob listLoggerJob = new ListTimerJob(List_JOB_NAME, site.WebApplication);
27
28            SPMinuteSchedule schedule = new SPMinuteSchedule();
29
30            schedule.BeginSecond = 0;
31
32            schedule.EndSecond = 59;
33
34            schedule.Interval = 5;
35
36            listLoggerJob.Schedule = schedule;
37
38            listLoggerJob.Update();
39
40        }
41
42        // Uncomment the method below to handle the event raised before a feature is deactivated.
43
44        public override void FeatureDeactivating(SPFeatureReceiverProperties properties)
45        {
46            SPSite site = properties.Feature.Parent as SPSite;
47
48            // delete the job
49
50            foreach (SPJobDefinition job in site.WebApplication.JobDefinitions)
51            {
52
53                if (job.Name == List_JOB_NAME)
54
55                    job.Delete();
56
57            }
58
59}
60
61   }
Before Deploying you should select the right scope of the Feature in other words in which scope you will activate the Feature(Farm,Site,Web,WebApplication) in our case we will activate Feature1 on Site which is mean Site Collection.

Note : if you trying to activate the feature in the wrong scope will get the following error

Now let us deploy our custom timer job >Right Click on Custom_TimerJob project > Click Deploy

Open now your SharePoint site and select ListTimerJob List and you should see something similar to the following image


Our custom timer job is working fine now you can go and check it and modify the schedule as following
Go to SharePoint 2010 central administration >Monitoring >in the Timer Jobs Section Select Review Job Definitions
and you should See our Custom Timer Job

Click on it and you should see Edit Timer Job Page ,Modify Timer Job schedule based on your requirement
Note : you can also modify schedule of your custom Timer Job from the code but you need to add one of the following class in FeatureActviated Event Handler as following

After Specific Minutes use SPMinuteSchedule class
Hourly use SPHourlySchedule class
Daily use SPDailySchedule class
Weekly use SPWeeklySchedule class
Monthly use SPMonthlySchedule class


Code on How to create Custom Timer Job in Sharepoint 2010

Based on my popular articel about Creating Custom Timer Job in Sharepoint 2010,I Have decide to upload the simple code  on how to create Custom Timer Job in Sharepoint 2010 ,But first let us know more about Timer Job
  • A timer job runs in a specific Windows service for SharePoint Server.
  • Timer jobs also perform infrastructure tasks for the Timer service, such as clearing the timer job history and recycling the Timer service; and tasks for Web applications, such as sending e-mail alerts.
  • A timer job contains a definition of the service to run and specifies how frequently the service is started.
  • The SharePoint 2010 Timer service (SPTimerv4) runs timer jobs.
  • Many features in SharePoint Server rely on timer jobs to run services according to a schedule.

Building the Sample

To run the sample you just need to open it in Visual Studio 2010 then deploy it to your test machine or you can package it to deploy it in Production environment.The solution itself will create list for you and try to fill it each five minutes.
Description
Based on my knoladge Customer Timer job in sharepoint 2010 is on of the most confused approch in SharePoint Many developer stuck at some point and they do not what to do to make it run correctly.So this sample will show you how to make it happent and run Custom Timer Job to achive you tasks in simple way.
C#
//Create class derived from SPJonDefinition Class 
 class ListTimerJob : SPJobDefinition 
    { 
         public ListTimerJob() 
 
            : base() 
        { 
 
        } 
 
        public ListTimerJob(string jobName, SPService service, 
SPServer server, SPJobLockType targetType) 
 
            : base(jobName, service, server, targetType) 
        { 
 
        } 
 
        public ListTimerJob(string jobName, SPWebApplication
 webApplication) 
 
            : base(jobName, webApplication, null
SPJobLockType.ContentDatabase) 
        { 
 
            this.Title = "List Timer Job"; 
 
        } 
 
        public override void Execute(Guid contentDbId) 
        { 
 
            // get a reference to the current site 
collection's content database 
 
            SPWebApplication webApplication = this.Parent
 as SPWebApplication; 
 
            SPContentDatabase contentDb = webApplication.
ContentDatabases[contentDbId]; 
 
            // get a reference to the "ListTimerJob" list in the
 RootWebof the first site collection in the content database 
 
            SPList Listjob = contentDb.Sites[0]
.RootWeb.Lists["ListTimerJob"]; 
 
            // create a new list Item, set the Title 
to the current day/time, and update the item 
 
            SPListItem newList = Listjob.Items.Add(); 
 
            newList["Title"] = DateTime.Now.ToString(); 
 
            newList.Update(); 
 
        } 
} 
//Add Event receiver at Feature Level  
[Guid("9a724fdb-e423-4232-9626-0cffc53fb74b")] 
public class Feature1EventReceiver : SPFeatureReceiver 
    { 
        const string List_JOB_NAME = "ListLogger"; 
        // Uncomment the method below to handle the event 
raised after afeature has been activated. 
 
        public override void FeatureActivated
(SPFeatureReceiverProperties properties) 
        { 
            SPSite site = properties.Feature.Parent as SPSite; 
 
            // make sure the job isn't already registered 
 
            foreach (SPJobDefinition job in site.
WebApplication.JobDefinitions) 
            { 
 
                if (job.Name == List_JOB_NAME) 
 
                    job.Delete(); 
 
            } 
 
            // install the job 
 
            ListTimerJob listLoggerJob = new ListTimerJob
(List_JOB_NAME, site.WebApplication); 
 
            SPMinuteSchedule schedule = new SPMinuteSchedule(); 
 
            schedule.BeginSecond = 0; 
 
            schedule.EndSecond = 59; 
 
            schedule.Interval = 5; 
 
            listLoggerJob.Schedule = schedule; 
 
            listLoggerJob.Update(); 
 
        } 
 
        // Uncomment the method below to handle the event 
raised before a feature is deactivated. 
 
        public override void FeatureDeactivating
(SPFeatureReceiverProperties properties) 
        { 
            SPSite site = properties.Feature.Parent as SPSite; 
 
            // delete the job 
 
            foreach (SPJobDefinition job in 
 site.WebApplication.JobDefinitions) 
            { 
 
                if (job.Name == List_JOB_NAME) 
 
                    job.Delete(); 
 
            } 
 
}  
//That's all

Source Code Files

SharePoint Project (CustomTimerJob) - contain List Instance so timer job can write on it.Also it contain class that derived from SPJobDefiniation as will as Event Receiver Feature that will rise when you activate the feature

Mastering Business Connectivity Services in SharePoint 2010 (Part 2)

In the first article in this series, Mastering Business Connectivity Services in SharePoint 2010 – Part 1 we created a BCS connector using the Visual Studio Template. In this article, we will create a connector to a database using a web service as the interface to the database. The web service will use LINQ to SQL as the Datacontext. You will need a SQL Server database to create a customer table, and an IIS server to deploy the Web Service outside of the SharePoint installation-and of course a SharePoint Site to create the interactions and Lists required for this article. Let’s begin:

BCS to Customer Connector

Step 1: create the customer Table-Database Script:
CREATE TABLE [dbo].[Customer_BCS](
[CustomerID] [int] IDENTITY(1,1) NOT NULL,
[CustomerName] [nchar](50) NULL,
[CustomerEmail] [nchar](50) NULL,
[CustomerRegion] [nchar](10) NULL,
[CustomerFY08Sales] [bigint] NULL,
[CustomerFY09Sales] [bigint] NULL,
CONSTRAINT [PK_Customer_BCS] PRIMARY KEY CLUSTERED(
[CustomerID] ASC
)
WITH (PAD_INDEX = OFF, STATISTICS_NORECOMPUTE = OFF,
IGNORE_DUP_KEY = OFF, ALLOW_ROW_LOCKS = ON,
ALLOW_PAGE_LOCKS = ON) ON [PRIMARY]
) ON [PRIMARY]

Step 2: Create the web service and LINQ to SQL Object:
Customer BCS WebService
Create a web service project in Visual Studio and add a LINQ to SQL object to the projects as shown below: Drag the Customer_BCS table created above from the server Explorer to the LINQ to SQL canvas as shown below:
Note: Here is the link to the source code for all the projects in this Article.
Customer BCS DBML
LINQ to SQL Customer Designer
There are 4 methods in the web service to perform CRUD operations on the customer Table which we will access from our BCS project- Here is the source code for one of those methods: Refer to Article 1 to create the methods required in the example: Mastering Business Connectivity Services in SharePoint 2010 – Part 1
BCS CRUD Operations
One of the keys here lies in the class CustomerSalesInfo as you will pass this object in and out of the webservice form your connector project
Customer Sales info
After you have completed creating the web service, deploy it to an IIS Server that can be located from the BCS Connector project below
Step 3: Create the connector Project in Visual Studio
Web Reference
Set a web reference to the web service as shown above. Then create the methods for the customer
BCS Model Customer
Here is the class for the customer Object:
Customer BCS
The call to the web service and the implementation to the Connector are shown below:
BCS Connector Demo
The key to the code that makes the whole process work is the objects for the LINQ to SQL and the Object for the web service: If you study the above code carefully, I think you will find that it is pretty easy to understand- and more importantly, it is pretty standard across all of the connectors created this way. That is, by using a web service and LINQ to SQL to do the CRUD operations on the Database Tables.
Cust BCS Datacontext
Use the sample code provided to compile, run and debug the code for a better appreciation of what is going on in the different classes.
Deploy the solution to Sharepoint and the connector should be ready to use.
Here is the endpoint that Visual Studio created when I added a web reference to the connector project- you will need to add a similar entry to your SharePoint web.conf:
Sharepoint End Point
Note: Here are some things to consider when deploying the full solution and are were required to make the solution run end-to-end without error:
Web Service:
Place Web Service on non-SharePoint site (for this example)
Add endpoints to web config on Sharepoint site for web service
Change web config on SharePoint to NTLM for above service
SharePoint:
Create/Add default forms for new and update methods in SharePoint designer
Add new methods for above to BCS connector
SharePoint:
Make Identifier read only on Read list and Read Item in the designer
On BCS Model: Set identifiers as update methods: updater field Preupdater fields to true
Database:
No changes- just create table
Step 4: Create External List in Sharepoint
External List in Sharepoint
Refer to article one on how to create the external in SharePoint: http://www.dotnetcurry.com/ShowArticle.aspx?ID=632- of course the data in the list will be different from what you see above, as you can add test items to the database when you create it.
Step 5: Create default forms in SharePoint Designer:
Notice in the form section that I have added 2 now forms to edit and add new customers and will be used by SharePoint as the default forms- if you don’t do this step you will get an error when you try to add or edit the customer list.
Sharepoint Designer
Step 6: Add, Update and Delete Data from the List created above
Add Update Delete List
Notice how the custname changed to Bob Jones 1 when the record was edited in SharePoint:
Uptaded List

Summary

Congratulation, you have now created a fairly complex piece of software that can serve as a template to your own connectors to your own data sources.
With SharePoint, though, there are many moving parts that have get used to and it will take some time for you to master all the elements, but this is definitely a good start!
Part 2 of this series showed you how to create powerful custom connectors that are connected to a database via Web Service Calls. I will continue to create articles that will illustrate the powerful features of BCS.

Mastering Business Connectivity Services in SharePoint 2010 (Part 1)

They call me the “Connector guy”- affectionately of course- where I work, because I am like a Business Connectivity Services (BCS) machine when it comes to crunching out connectors to legacy systems. So I thought I would take the time to help others get over the learning curve of leaning to use BCS.
After reading this article, I hope you will agree that creating External list to data is just a walk in the park-like most tasks developers do, when they get the hang of it. The following chart is a good reference and depicts nicely that many tasks can be performed using the BCS architecture. In fact, almost any tasks can be performed using simple lists exposed by Business Connectivity Services (BCS) Services. In fact, “Everything is a list”, is one of my popular sayings.

BCS Architecture

BCS SharePoint 2010 Architecture
So if everything is a list, then let’s get started building some lists!
Note: I am going to assume that you have a development environment set up- probably on a virtual machine, and that you have an instance of SharePoint 2010 on that machine. Microsoft has simplified the development process greatly, but requires a lot of software installed as a prerequisite to getting started with SharePoint development. Ah, the pains of being a Microsoft developer!
Anyway, fire up VS 2010 and select File, New, and Project from the file menu. Again, Microsoft has done a nice job of creating templates for a lot of the SharePoint objects required to be successful in this environment- and yes, there is a BCS Template:
Business Data Connectivity Model
After selecting Business Data Connectivity Model from the SharePoint 2010 list and naming the project whatever you want, you will and up with the good, start towards creating a connector that will be exposed as a list on your SharePoint site:
SharePoint Connector
I know what you’re thinking. This looks like any other template, with very little functionality and a lot of work to get it in shape to work in a real-world environment. Am I right? Well, your thinking is correct, but that is the reason I am writing this article. I thought the same thing, and as it turns out there a lot of little nuances in creating a “good connector”, and I will show the best way that I have found- and you can modify my model to fit your style.
Note: I think you will find using BCS, that taking small steps is going to prove to be a better strategy then plowing through all the steps and getting to the end, only to have a connector that is throwing errors and not being able to figure out how to fix them-(The correlation id problem- more on that later.)
So here is the first small step: Let’s rebuild the solution and deploy it to SharePoint - we will find out many things from this simple task:
1. Will the project compile without error?
2. Will it deploy to SharePoint?
3. Can we set the appropriate security settings on our BCS Component?
4. Can we create an External list in SharePoint using this BCS Component?
If all the steps go well and run without error, then we will be able to begin creating custom BCS components. The steps are as follows
Step 1 - Rebuild the solution
Step 2 - Deploy the solution
Step 3 - Set the permissions
Step 4 - Create External List in SharePoint 2010
Step 5 - Preview the list
Let us explore these steps in details:
Step 1: Rebuild the Solution
Select build rebuild solution from the File menu
Step 2: Deploy the Solution
Select build deploy from the File menu
Step 3: Set the permissions
Open SharePoint Central Administration (http://yoursite:8080) in most cases
Click on application management > manage service applications > Business Data Connectivity Service and find Entity1 from the list- this is the entity that we just deployed
SharePoint BCS Model Permission
Click on Entity1 and you should see this screen:
SharePoint BDC Object
Click on set object permissions and give the appropriate rights to those who will be viewing the list
Step 4: Create the external list
Go to the main SharePoint site (http://yoursite) and click on site actions > view all site content > create, external list > create
Sharepoint External List
Click the second icon from the External Content Type and select Entity1 from the pop-up:
Sharepoint External Content Type
Select create and your list will be created
Step 5: Preview the list
Preview Sharepoint BCS List

Summary

Congratulation, you’re on your way to becoming the “connector guy/girl” at your company. Of course this connector doesn’t do much, but we have fulfilled all the steps required to our ultimate goal of making “everything is a list”. If you have gotten this far, and you are looking at the list we created above, then all the obstacles have been cleared to creating your own, more powerful connectors!

SharePoint Foundation 2010 with ADO.NET Data Services

In this article, we will see how to use ADO.NET Data Services introduced in SharePoint Foundation Services 2010. We will perform CRUD (Select, Insert, Update and Delete) operations using ADO.NET Data Services.
The steps to create a SharePoint Site using a Template ‘Team Site’ remains the same, as shown in my previous article SharePoint Dashboard with Common Filters using PerformancePoint Services 2010.
Now assuming you have created a SharePoint site with ‘Team Site’ template, let’s add a ‘Customers’ list as described in below table. To create a list, click on ‘Lists’ link from the left hand navigation pane and click on ‘Create’ button. A ‘Create’ dialog box will be shown –
clip_image002
Once we have created a first list, we need to add a couple of columns as described in the below tables. To create a column, click on list settings from the top ‘Ribbon’ as shown below –
clip_image004
Now click on ‘Create Column’ link from the list settings page as shown below –
clip_image006
Now create the lists as described below. Also add some sample data in the lists –
Customers List –
clip_image008
Let’s add sample data to our ‘Customers’ list.
Create a ‘Window Project’ named ‘DataServiceInSPS2010’ using ‘Microsoft Visual Studio 2010’ as shown below –
clip_image010
Now design the Windows Form for our operations as shown below –
clip_image012
clip_image014
Note: Do not forget an important setting. Right click the ‘Windows Project’ in solution explorer and go to properties. From properties window, choose ‘Build’ option from the right hand side and set ‘Platform target’ to ‘x64’ as shown below –
clip_image016
Now we will have to add a Data Service reference in our project. Let’s first test the service which will allow us to query the data of the Lists, available in our SharePoint site. So open IIS and browse the SharePoint Web application and find ‘_vti_bin’ folder from that web application. Click on ‘Content View’ on the right hand window and look for a service named ‘ListData.svc’ as shown below –
clip_image018
Right click the ‘ListData.svc’ and click on ‘Browse’. You will see the list of all the SharePoint Lists in a browser as shown below –
clip_image020
Now let’s go back to our Windows Application which we have created few steps back and add a service reference of ‘ListData.svc’ data service in our application, as shown below –
clip_image022
This will show you a Add Service Reference dialog box. Copy the URL of the ‘ListData’ service which we just browsed. Click on the ‘GO’ button and name the service as ‘PurchaseOrderProxy’ as shown below –
For Example, here’s the url on my machine - http://localhost:21068/_vti_bin/ListData.svc
clip_image024
When you add the reference of ADO.NET data service in your application, it creates an ‘Object – Relational Mapping’ to the Lists, in our web site. It also creates a class called ‘SiteNameDataContext’ which contains the properties for each list of the web site.
The benefits of using ADO.NET Data Services –
1) You query the list data which is strongly typed.
2) As ADO.NET Data Services uses ‘Object – Relational Mapping’, it creates a type for each list in site data context class.
3) Any kind of client application can use ADO.NET Data Services.
Once you add the service reference, let’s start coding the application. As per our design, we have a DataGrid. First step is to show all the items of ‘Customers’ list in our DataGrid control.
Let’s go to the code behind of the windows form and declare an object of the SharePoint site data context which got generated when we added the service reference. The code is shown below –
Import the namespace - using DataServiceInSPS2010.PorchaseOrderProxy;
Declare an object of the site data context at class level –
PurchaseOrderSystemDataContext dataContextProxy = new PurchaseOrderSystemDataContext(new Uri("http://wingtipserver:21068/_vti_bin/ListData.svc",UriKind.Absolute));
Now in the Form_Load event, write the code shown below. This will pass the current user ID and password to authenticate the user and fetch the data of ‘Customers’ list as shown below –
clip_image026
If you observe the code shown above, each Customer item is presented by a class called ‘CustomersItem’. By writing a LINQ query, we are fetching the data from the customers list.
Now hit ‘F5’ and you will see the data of ‘Customers’ list in our DataGrid as shown below –
clip_image028
Now let’s write the code for our ‘New’ button as shown below –
image
Now let’s write the code to insert the item in the list ‘Customers’ as shown below –
clip_image030
In the above code, we are using AddToCustomers method which will take an instance of CustomerItem. Site data context provide methods for adding, updating and deleting for each list available in SharePoint Site. To insert the item into the list, use the method – SaveChanges() of the site data context.
Please note that for updating and deleting, you need to fetch all the columns of the list.
Now let’s add the code for updating an item available in ‘Customers’ list. The code is shown below –
clip_image032
In the above code, we are first fetching the row of the customer list and then making the changes using a method UpdateObject() which takes an object of CustomerItem class. After this step, we call the SaveChanges() method which will update the item back to SharePoint customers list.
Now let’s write the code for deleting an item from the customers list. The code is as shown below –
clip_image034
In the above code, we are first fetching the row of the customer list and using a method ‘DeleteObject’ which takes an object of CustomerItem class. After that we are calling SaveChanges() method which will delete the item from the SharePoint customers list.
Now try adding, updating and deleting the items from the ‘Customers’ list.
Conclusion – In this Article we have seen how to use ADO.NET Data Service called ‘ListData.svc’ to perform the CRUD operations against the SharePoint List.