In this article, we
will see how to perform LINQ queries on SharePoint cascade lists. We
will also see how to perform CRUD (Select, Insert, Update and Delete)
operations using LINQ to SQL.
The steps to create a SharePoint Site using a Template ‘Team Site’ remains the same, as shown in my previous article, SharePoint Dashboard with Common Filters using PerformancePoint Services 2010.
After you have created a
SharePoint site with ‘Team Site’ template, let’s add some lists as
described in the tables you will see shortly. To create a list, click on
‘Lists’ link from the left hand navigation pane and click on ‘Create’
button. A ‘Create’ dialog box will appear, as shown below:

Once we create the
first list, we need to add a couple of columns as described in the
tables shown below (scroll down). To create a column, click on list
settings from the top ‘Ribbon’

Now click on ‘Create Column’ link from the list settings page as shown below –

Now create the lists as described below. Also add some sample data in the lists –
Customers List –

Products List –

Orders List –

Note: When
you create a lookup column, you can implement a cascade effect in
SharePoint 2010. So for ‘ProductID’ column do not enforce the ‘Delete
cascade’ rule whereas apply delete cascade rule for ‘CustomerID’ lookup
column. A sample is shown below –

Now as we have created
all the lists with the sample data, let’s focus on our main requirement,
i.e. to query the list data using LINQ.
SharePoint provides a
tool to convert all the ‘Lists’ into ‘Entities’ which we can add to our
Visual Studio project and then can query against the SharePoint Lists.
So to create the entity from a SharePoint list, we will use a tool
called ‘SPMetal.exe’. We can find this tool at the following path –

To generate the
‘Entities’ from our ‘Lists’, open ‘Command Prompt’ and change the path
as shown above. Now write the following command to generate the entities
–

Now go to the path shown above and find the file ‘SPPurchaseOrder.cs’. We will use this file to query our ‘SharePoint Lists’.
Now let’s create a ‘Window Project’ with the name ‘LINQToSharePoint’ using ‘Microsoft Visual Studio 2010’ as shown below –

Now add the file
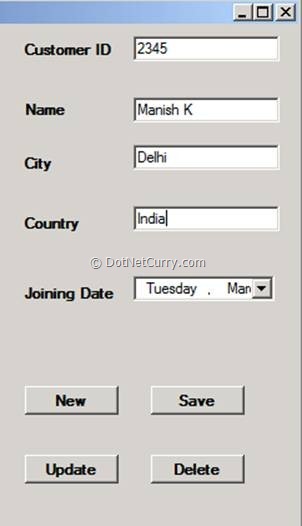
‘SPPurchaseOrder.cs’ file to our project. Let’s design a Windows Form
for our operations with the following controls, as shown below –


Most important setting – I have seen many developers who develop using Visual studio 2010, forget an important step.
Right click the
‘Windows Project’ in Solution explorer and go to properties. From the
properties window, choose ‘Build’ option from the right hand side and
set the ‘Platform target’ to ‘x64’ as shown below –

Now add a reference to
the ‘Microsoft.SharePoint.LINQ.dll’ file to our project. Let’s import
the namespace ‘SPPurchaseOrderNS’ in our code behind and declare an
object of the data context as shown below –
SPPurchaseOrderDataContext dataContext = new SPPurchaseOrderDataContext("http://localhost:21068");
Now let’s write some code in the ‘Form_Load’ event that binds the query result to the Datagridview –

On the ‘New’ button click event, write the following code to reset the controls –

Now to add the item in the ‘Customers’ list, write the following code in the click event of ‘Save’ button –

Finally insert the record as shown below and click on the ‘Save’ button –

Once you insert the
item in the ‘Customers’ list, check your customers list in SharePoint
site and confirm that it has been correctly inserted –

Now write some code for
updating a record from the ‘Customers’ list. Write the code shown below
in the click event of the ‘Update’ button –

Now if you enter the ‘Customer ID’ and change the name of the customer, it will get updated in SharePoint list as shown below –

The earlier name was
‘Pravinkumar R. D.’ and after an update, it is ‘Pravin D’. The final
step is to add functionality to delete a customer record from
‘Customers’ list and see how the cascading clause deletes the dependent
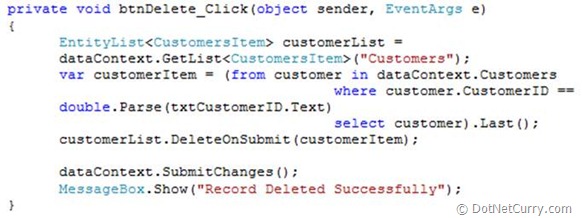
‘Orders’ from orders list. So for the ‘Delete’ functionality, write the
following code –

Now enter the
‘CustomerID’ and click on ‘Delete’ button. If you observe, your customer
record as well as orders attached with that customer, will be deleted
from the lists. Let’s observe this –
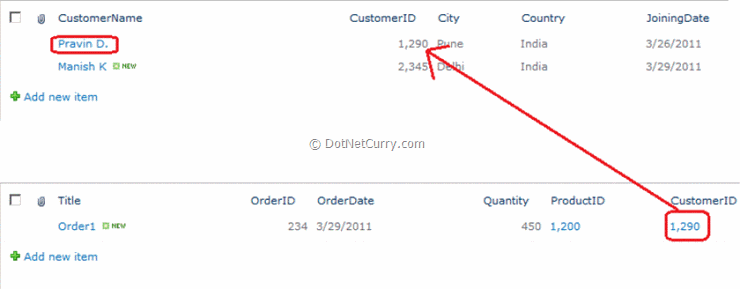
Before ‘Delete’, the items in ‘Customer List’ and ‘Orders List’ look like this –

And after deleting the item, it looks this –

So now we are sure that
our cascade settings on the Orders list is in effect. As soon as you
delete the item from Customers list, the associated Orders for that
Customer, will be deleted.
Summary – In this article we have seen how to create SharePoint Lists with cascade and perform CRUD operations on SharePoint Lists.
The entire source code of this article can be downloaded over here

No comments:
Post a Comment