
Many
a times, we may want to upload documents in a SharePoint server and
place these documents in a document library. Document Libraries can
consist of different files. The best part about this is that we can
share these different files from the document library with other team
members . In this article, we will discuss how to add a document to a
SharePoint document library through a WebService.
Update: This article does not use a Webservice, but instead uses the SharePoint API. Apologies for the incorrect title.
This
article will discuss only about adding documents using WebServices,
however we can similarly upload documents using WCF services or through
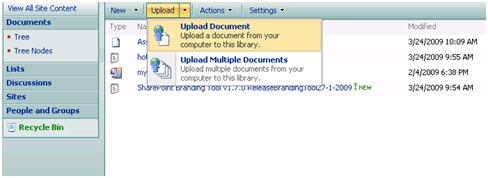
Web pages. We can also upload documents directly using the Upload menu
from the SharePoint Interface. You can see interface for adding
documents directly using the SharePoint interface below.
Let us see how to add documents to the Document Library using a WebService
Step 1: At first we will Create a New ASP.Net WebService Application. Open Visual Studio. File > NewProject> Select the language (C# or VB.NET) > Select Web Template >Select ASP.Net WebService Application.
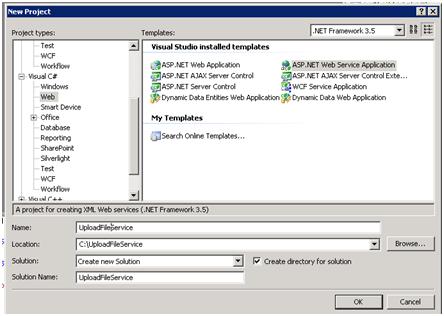
Step 2:
Name it as UploadFileService and specify the location where you want to
save that project. This step will create a Service1.asmx file.
Step 3: The Service1.asmx file by default will contain a HelloWorld method as shown below:
C#
[WebMethod]
public string HelloWorld()
{
return "Hello World";
}
VB.NET
<WebMethod> _
Public Function HelloWorld() As String
Return "Hello World"
End Function
Step 4:
We will change the method name to “UploadFileToDocmentLibrary” and the
return type to void. So now our method will look like this.
C#
[WebMethod]
public void UploadFileToDocmentLibrary()
{
}
VB.NET
<WebMethod> _
Public Sub UploadFileToDocmentLibrary()
End Sub
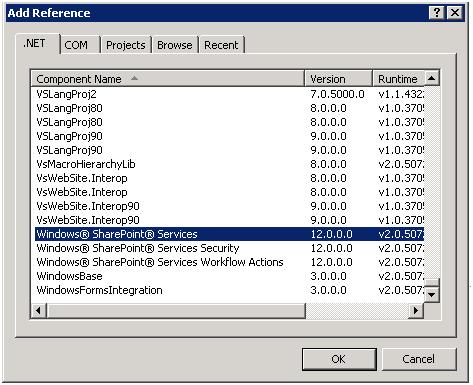
Step 5:
Add a reference to the Microsoft. SharePoint dll as shown in screenshot
below and add the Namespace to your .cs or .vb file. This namespace is
required to be used in the SharePoint Site
C#
using Microsoft.SharePoint;
VB.NET
Imports Microsoft.SharePoint
Step 6:
Now add code in “UploadFileToDocmentLibrary“ method for connecting to
your SharePoint site and adding a document. We can upload the document
from the Fileupload control also, but here we will take the data from a
bytearray directly.
Our Complete web method will look like this.
C#
[WebMethod]
public void UploadFileToDocmentLibrary()
{
//Referring Top level sharepoint site
//Change URI according to your sharepoint site
using (SPSite sharePointtopLevelSite = new SPSite("http://localhost"))
{
//Will get Website collection inside top level site
//Here my Toplevel site contains a website named test .
//Change name according to your site settings
SPWeb websiteCollection = sharePointtopLevelSite.AllWebs["test"];
websiteCollection.AllowUnsafeUpdates = true;
websiteCollection.Lists.IncludeRootFolder = true;
//Will get List collection inside a website
//Here my Toplevel site contains a List named tree .
//Change name according to your site settings
SPList docLibrary = websiteCollection.Lists["Tree"];
//Here we are converting a Text to Byte Array
//We can get byte array from Fileupload control of asp.net also
//Add Reference to System.Text Namespace
Byte[] contentArray = Encoding.ASCII.GetBytes("Hello Sharepoint.");
// Uploading the file to SharePoint doclib
SPFile file = websiteCollection.Files.Add(websiteCollection.Url.ToString() + "/" + docLibrary.Title.ToString() + "/" + "SharePointTest.txt", contentArray);
file.Update();
}
}
VB.NET
<WebMethod> _
Public Sub UploadFileToDocmentLibrary()
'Referring Top level sharepoint site
'Change URI according to your sharepoint site
Using sharePointtopLevelSite As New SPSite("http://localhost")
'Will get Website collection inside top level site
'Here my Toplevel site contains a website named test .
'Change name according to your site settings
Dim websiteCollection As SPWeb = sharePointtopLevelSite.AllWebs("test")
websiteCollection.AllowUnsafeUpdates = True
websiteCollection.Lists.IncludeRootFolder = True
'Will get List collection inside a website
'Here my Toplevel site contains a List named tree .
'Change name according to your site settings
Dim docLibrary As SPList = websiteCollection.Lists("Tree")
'Here we are converting a Text to Byte Array
'We can get byte array from Fileupload control of asp.net also
'Add Reference to System.Text Namespace
Dim contentArray() As Byte = Encoding.ASCII.GetBytes("Hello Sharepoint.")
' Uploading the file to SharePoint doclib
Dim file As
SPFile = websiteCollection.Files.Add(websiteCollection.Url.ToString()
& "/" & docLibrary.Title.ToString() & "/" &
"SharePointTest.txt", contentArray)
file.Update()
End Using
End Sub
Step 7: Run this application and Refresh your web page and you will get the file name ‘SharepointTest’ in your document library

That's it!
No comments:
Post a Comment